
WordPress is one of the best Content Management System (CMS) in the digital platform. After developing this system a new era has started in the website world. Because of this system, making a website is very simple for us. But to make our website, one more thing we have to know is plugin. In this article I will tell you about Plugins and How to install plugin in WordPress.
Now those who are involved in this field may know about plugins in WordPress. Once again I am telling you in short for your remember. Plugin is one kind of small bundle of program tools which will make your basic WordPress program stronger and help to make your site more functional, lucrative and secure.
At present, more than 55,000 free plugins are available in WordPress user free section. Also thousands are premium plugins available by paid basis. To utilize these plugins for your website’s better performance first you have to install it in your system then use it.
Three types of installation system are there for installing plugins in WordPress.
- From WordPress dashboard
- Manual Installation
- File Transfer Protocol (FTP)
Let’s see step by step of above three installation systems in below;
How to install Plugin from WordPress Dashboard:
To install Plugin from WordPress free or premium section, you have to follow the below steps;
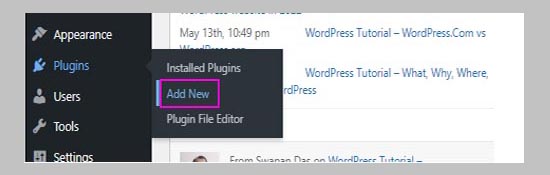
Step-1: Go to your WordPress dashboard and then select Plugins from the left side horizontal Manu, then click Add New.
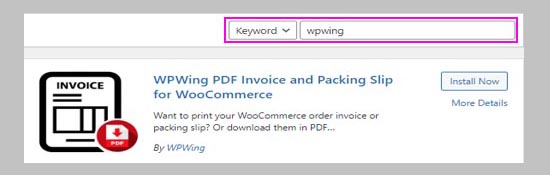
Step-2: From the Add Plugins screen, you can search your plugins using Keyword in the top right corner of the search bar.
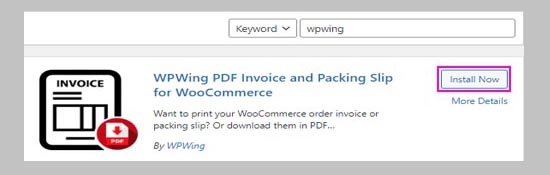
Step-3: After getting your defined plugin on the plugins screen, click on Install Now button.
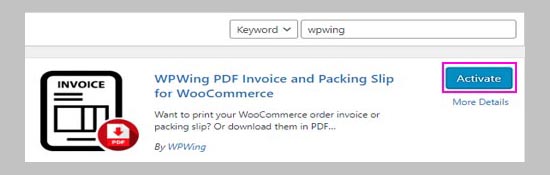
Step-4: After finishing the installation, you have to activate the plugin by clicking on the Activate button on the top right corner.
You can deactivate your installed plugin by clicking on Plugins and then Installed Plugins section.
How to Installing plugin by Manual Installation:
To install manually, you have to download your desired plugins from your web source. After finish your download plugin as .zip format. Unzip your plugin .zip file in your computer hard drive. Be sure that the extracted folder name is the same as the .zip file. then follow the below steps;
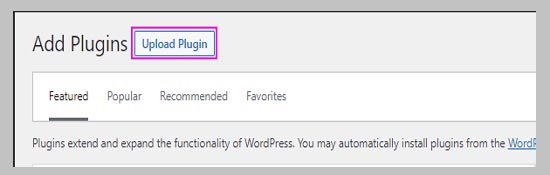
Step-1: Go to your dashboard then select Plugins from the left side horizontal manu, then click Add New.

Step-2: Then from the top left corner of your page click Upload Plugin.
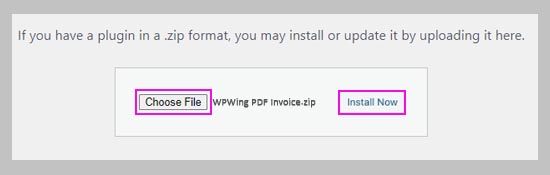
Step-3: Click the Choose File button and locate your download file, then click Install Now.
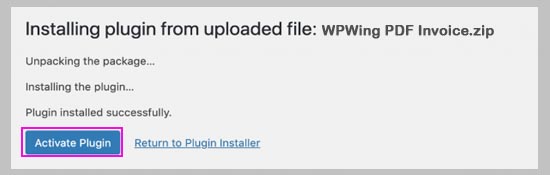
Step-4: After finishing the installation click Activate Plugin from the down left corner of your installation confirmation note.
Deactivation system is the same as From Dashboard section
How to Installing plugin by File Transfer Protocol (FTP)
To install the plugin using File Transfer Protocol (FTP) system you also need the plugin as .zip format. Be sure that your plugin service is from a legal source. Then follow the below steps to install your plugin properly;
Step-1: Unzip your plugin .zip file in your computer hard drive. Be sure that the extracted folder name is the same as the .zip file.
Step-2: Connect your WordPress website to the server with the help of File Transfer Protocol. Connect to the host server for transfer files.
Step-3: After opening the FTP Client, connect your website to the server. For that, you might need help from your hosting provider.
Step-4: Then from your WordPress directory open wp-content and then plugin folder.
Step-5: Upload your unzipped plugin folder which you download to the plugin folder.
Step-6: Finally again come back to your dashboard and click Plugins and then Installed plugin. Select your new plugin and Activate.
I hope, to follow the above processes, you can install your plugin and work with it. But besides proper installing system, also you have to keep alert some small but important fact which stated below;
Remember before Select and Install your Plugin:
As we know there are a lot of free and premium plugins available in WordPress as well as outsourcing. Before installing your desired plugin remember some basic facts about plugin and its installation.
Fit for the Job: Before installing any plugins for your job, I suggest you read and understand developers’ demands about the function of the plugin. Most beginners make this mistake. So, first read plugin documentation, its support and reviews. It will make you understand the plugin’s act, support, and its popularity.
Update: WordPress always release update time to time to update their plugin. You have to keep track of their latest update and update your plugin. It will show you the developer’s activeness of improving and managing their plugin. To see their number of installations, you will understand their popularity. And also monitoring their rating you can justify their plugin quality.
Besides the above two observations also you have to keep remember that, always install one plugin at a time and only one plugin for a single task.
Conclusion:
I think this article will help you to understand, How to install Plugin in WordPress. And also you can select the proper plugin for your particular function.
Leave a Reply